关于本站
1、基于Django+Bootstrap开发
2、主要发表本人的技术原创博客
3、本站于 2015-12-01 开始建站
上一篇文章讲如何创建决策树,创建结果不够直观清晰。所以这次讲如何通过matplotlib绘制决策树。
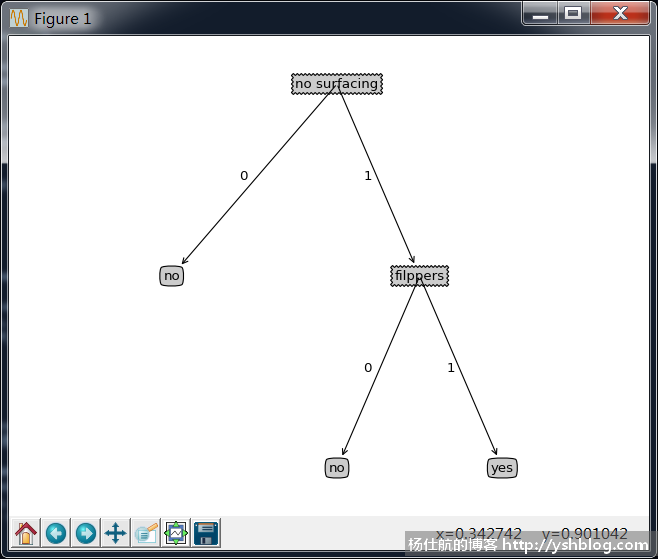
先给大家看看效果,调调胃口。

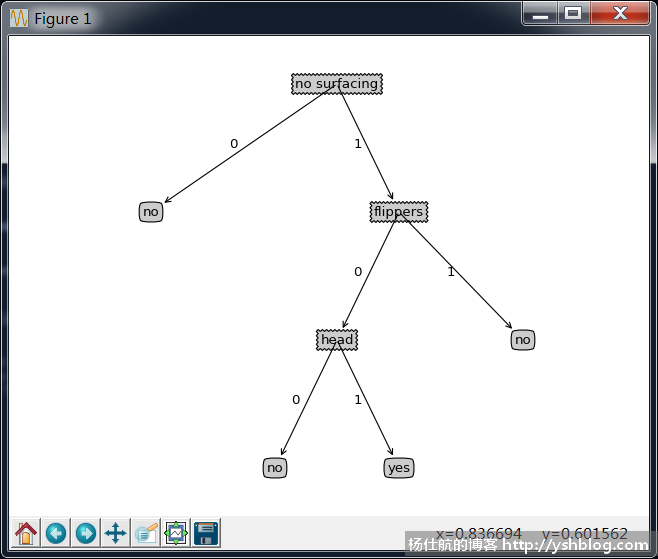
可以更复杂些,根据决策树来绘图:

《机器学习实战》书中,该部分的代码有些混乱。我重新构造了代码,创建一个类。
其中,绘制最基本的树节点是如下代码:
#coding:utf-8
import matplotlib.pyplot as plt

#边框样式
decision_node = dict(boxstyle='sawtooth',fc='0.8')
leaf_node = dict(boxstyle='round4',fc='0.8')

#引导线样式
arrow_args = dict(arrowstyle='<-')

#节点绘制(画布,文本,箭头终点,箭头起点,边框样式)
def plot_node(sub_ax, node_text, start_pt, end_pt, node_type):
    sub_ax.annotate(node_text,
        xy = end_pt, xycoords='axes fraction',
        xytext = start_pt, textcoords='axes fraction',
        va='center', ha='center', bbox=node_type, arrowprops=arrow_args)

if __name__ == '__main__':
    fig = plt.figure(1, facecolor='white')
    fig.clf()
    axprops = dict(xticks=[], yticks=[]) #去掉坐标轴
    sub_ax = plt.subplot(111, frameon=False, **axprops)

    #绘制节点
    plot_node(sub_ax, 'a decision node', (0.5, 0.1), (0.1, 0.5), decision_node)
    plot_node(sub_ax, 'a leaf node', (0.8, 0.1), (0.3, 0.8), leaf_node)
    plt.show()
该代码绘制效果如下,你可以用该代码测试一下。

创建一个drawtree.py文件。写入如下代码:
#coding:utf-8
import matplotlib.pyplot as plt

class DrawTree():
    #边框样式
    decision_node = dict(boxstyle='sawtooth',fc='0.8')
    leaf_node = dict(boxstyle='round4',fc='0.8')

    #引导线样式
    arrow_args = dict(arrowstyle='<-')

    def __init__(self, tree_data):
        self.tree_data = tree_data

        #计算基础数据
        self.width_step = 1./self._get_leafs_num(tree_data)    #每个叶子的占据比例
        self.height_step = 1./self._get_tree_depth(tree_data) #树的层次的占据比例

        #坐标轴范围0~1
        self.x_off = -0.5 * self.width_step
        self.y_off = 1.

    def create_plot(self):
        #创建图表容器
        self.fig = plt.figure(1, facecolor='white')
        self.fig.clf()
        axprops = dict(xticks=[], yticks=[]) #去掉坐标轴
        self.sub_ax = plt.subplot(111, frameon=False, **axprops)

        #绘制树
        self._plot_tree(self.tree_data, (0.5, 1.), '')
        plt.show()

    #获取叶子的数量
    def _get_leafs_num(self, tree_data):
        num = 0
        for value in tree_data.values():
            if isinstance(value, dict):
                num += self._get_leafs_num(value)
            else:
                num += 1
        return num

    #获取树的层数
    def _get_tree_depth(self, tree_data):
        max_depth = 0 #记录同级最大的层数
        #去掉外层的字典
        data = tree_data[tree_data.keys()[0]]
        for value in data.values():
            if isinstance(value, dict):
                cur_depth = 1 + self._get_tree_depth(value)
            else:
                cur_depth = 1

            if cur_depth > max_depth:
                max_depth = cur_depth
        return max_depth

    #绘制引导线的文本
    def _plot_midtext(self, start_pt, end_pt, mid_text):
        mid_x = (end_pt[0] - start_pt[0])/2. + start_pt[0] - 0.03
        mid_y = (end_pt[1] - start_pt[1])/2. + start_pt[1]
        self.sub_ax.text(mid_x, mid_y, mid_text)

    #节点绘制
    def _plot_node(self, node_text, start_pt, end_pt, node_type):
        self.sub_ax.annotate(node_text,
            xy = end_pt, xycoords='axes fraction',
            xytext = start_pt, textcoords='axes fraction',
            va='center', ha='center', bbox=node_type, arrowprops=self.arrow_args)

    #树绘制
    def _plot_tree(self, tree_data, end_pt, node_text):
        #根据本节点叶子个数计算起始位置
        leaf_num = self._get_leafs_num(tree_data)
        start_pt = (self.x_off + (1.+leaf_num)/2 * self.width_step, self.y_off)

        #绘制分类节点
        sub_key = tree_data.keys()[0]
        sub_dict = tree_data[sub_key]

        self._plot_node(sub_key, start_pt, end_pt, self.decision_node)
        self._plot_midtext(start_pt, end_pt, node_text)

        self.y_off -= self.height_step #下一层
        for key,value in sub_dict.items():
            if isinstance(value, dict):
                self._plot_tree(value, start_pt, key)
            else:
                self.x_off += self.width_step

                #绘制结束节点
                self._plot_node(value, (self.x_off, self.y_off), start_pt, self.leaf_node)
                self._plot_midtext((self.x_off, self.y_off), start_pt, key)
        self.y_off += self.height_step #上一层

if __name__ == '__main__':
    test = {'no surfacing': {0: 'no', 1: {'filppers': {0: 'no', 1: 'yes'}}}}
    #test = {'no surfacing': {0: 'no', 1: {'flippers': {0: {'head': {0: 'no', 1:'yes'}}, 1:'no'}}}}
    #test = {'no surfacing':{0:'no',1:{'flippers':{ 0:'no', 1:'yes'}}, 3:'maybe'}}
    tree = DrawTree(test)
    tree.create_plot()
在DrawTree实例化的时候,传递一个决策树。执行create_plot方法,创建图形。
我们可以打开前面文章写的创建决策树代码后面添加绘制决策树的代码。
if __name__ == '__main__':
    dataset, labels = create_dataset()
    mytree = create_tree(dataset,labels[:])

    print(mytree)

    #绘制决策树
    from drawtree import DrawTree
    DrawTree(mytree)
一般决策树是固定不变的。每次需要都计算一次,重新获取决策树,显得不经济。
我们可以把第一次计算出来的决策树保存,下次使用的时候,再直接读取。
由于我们的决策树是字典,可以用json模块转成字符串保存到文本文件。读取的时候,再将字符串转成字典。
或者可以使用pickle模块保存和读取变量的内容。
#coding:utf-8
import pickle

#保存决策树到文件
def save_tree(tree_data, filename):
    with open(filename, 'w') as f:
        pickle.dump(tree_data, f)

#从文件中加载决策树
def load_tree(filename):
    with open(filename, 'r') as f:
        tree = pickle.load(f)
    return tree
main部分的代码可以调整如下:
if __name__ == '__main__':
    test_file = 'test_tree.txt'

    import os #这句话放在文件头
    if os.path.isfile(test_file):
        #从文件中加载
        mytree = load_tree(test_file)
        labels = ['no surfacing', 'filppers']
    else:
        #找不到文件,则通过上面的分类算法得到决策树
        dataset, labels = create_dataset()
        mytree = create_tree(dataset,labels[:])

        #保存决策树
        save_tree(mytree, test_file)

    print(mytree)

    #测试
    test_vects = [[0,0],[0,1],[1,0],[1,1]]
    for vect in test_vects:
        result = classify(mytree, labels, vect)
        print('%s:%s' % (vect, result))
决策树算法到此讲解完毕。
优点很明显,可以快速分类,减少计算量的开支。
缺点也很明显,无法模糊处理,可能会过度匹配。
关于模糊处理的问题,接下来会讲朴素贝叶斯算法,基于概率论的分类算法。
点击查看相关目录。
相关专题: 机器学习实战
1271787323@qq.com
🐖
2018-06-01 18:19 回复