关于本站
1、基于Django+Bootstrap开发
2、主要发表本人的技术原创博客
3、本站于 2015-12-01 开始建站
添加评论和回复功能限制了只能注册用户才能评论和回复。前面就加了用户认证功能,可参考博文:
有了用户之后,得给个页面查看相关信息和修改资料等。开发这东西是需要一步一步完善的,所以今天完善一下这个功能,添加用户中心。大概要做成如下页面:
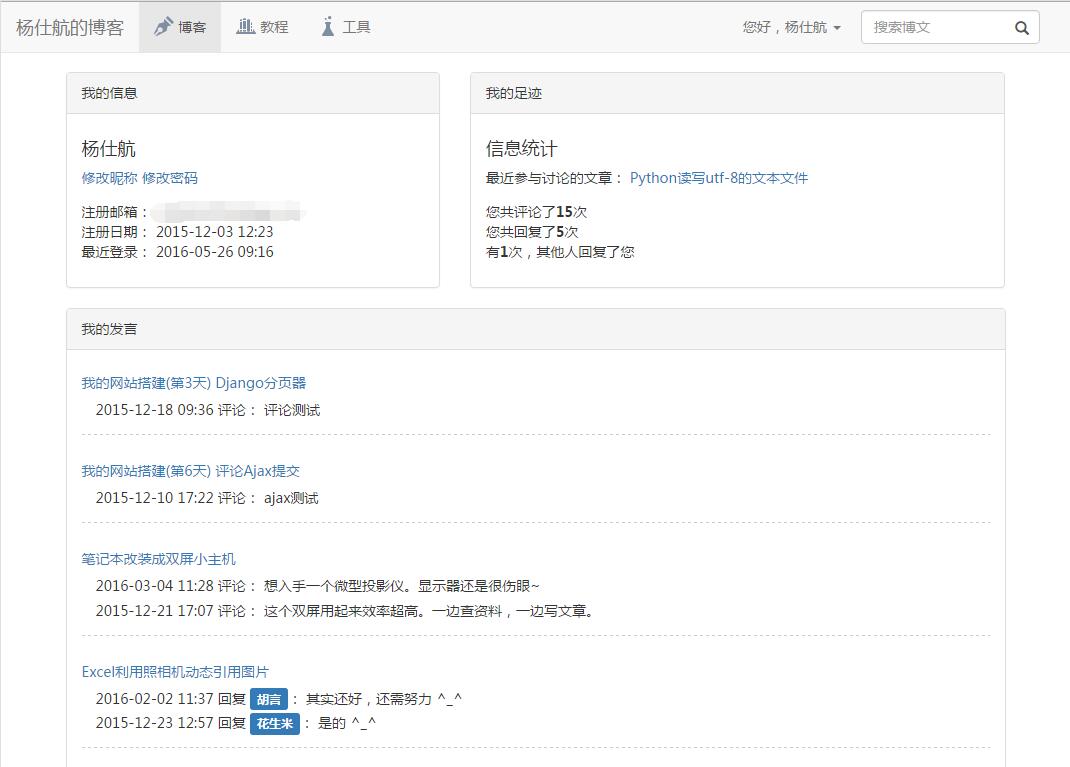
分3个部分:用户信息,评论统计,评论列表。
那么先写这些获取这些数据,方便提交给模板。在根目录下的helper文件夹(我专门放置辅助脚本的文件夹)添加comments_count.py文件,代码如下:
#coding:utf-8
from django.db import connection, transaction
import django_comments
from blog.models import Blog

def get_comments_count(user_id, content_type = 'blog'):
    """get the blog comments count"""
    #获得一个游标(cursor)对象
    cursor = connection.cursor()
    sql = ur"""
        select count(django_comments.id)
        from django_comments
        left join django_content_type
        on django_comments.content_type_id = django_content_type.id
        where django_content_type.app_label = %s and user_id = %s and root_id = 0
        """
    paras = [content_type, user_id]
    cursor.execute(sql, paras)    #执行sql语句
    raw = cursor.fetchone()       #获取第一行
    return raw[0]

def get_replies_count(user_id, content_type = 'blog'):
    """get the blog replies count"""
    #获得一个游标(cursor)对象
    cursor = connection.cursor()
    sql = ur"""
        select count(django_comments.id)
        from django_comments
        left join django_content_type
        on django_comments.content_type_id = django_content_type.id
        where django_content_type.app_label = %s and user_id = %s and root_id > 0
        """
    paras = [content_type, user_id]
    cursor.execute(sql, paras)    #执行sql语句
    raw = cursor.fetchone()       #获取第一行
    return raw[0]

def get_to_reply_count(user_id, content_type = 'blog'):
    """get to be replyed count"""
    #获得一个游标(cursor)对象
    cursor = connection.cursor()
    sql = ur"""
        select count(django_comments.id) from django_comments
        where user_id = %s and id in (
        select django_comments.reply_to
        from django_comments
        left join django_content_type
        on django_comments.content_type_id = django_content_type.id
        where django_content_type.app_label = %s and root_id>0)
        """
    paras = [user_id, content_type]
    cursor.execute(sql, paras)    #执行sql语句
    raw = cursor.fetchone()       #获取第一行
    return raw[0]

def last_talk_about(user_id, content_type = 'blog'):
    """get last talk about blog"""
    #获得一个游标(cursor)对象
    cursor = connection.cursor()
    sql = ur"""
        select django_comments.object_pk
        from django_comments
        left join django_content_type
        on django_comments.content_type_id = django_content_type.id
        where django_content_type.app_label = %s and user_id=%s
        order by submit_date desc limit 1
        """
    paras = [content_type, user_id]
    cursor.execute(sql, paras)    #执行sql语句
    raw = cursor.fetchone()       #获取第一行

    try:
        return Blog.objects.get(id = raw[0])
    except Exception as e:
        return None

def all_talk_about(user_id):
    """get all talk about blogs"""
    sql = ur"""
        select blog_blog.* from blog_blog
        where id in (select django_comments.object_pk
        from django_comments
        left join django_content_type
        on django_comments.content_type_id = django_content_type.id
        where django_content_type.app_label = 'blog' and user_id=%s)
        """ % user_id

    blogs=list(Blog.objects.raw(sql))   #raw_query对象是一个生成器
    comment_model = django_comments.get_model()

    for blog in blogs:
        sql = ur"""
                select django_comments.*
                from django_comments
                left join django_content_type
                on django_comments.content_type_id = django_content_type.id
                where django_content_type.app_label = 'blog' and user_id=%s and django_comments.object_pk='%s'
                order by submit_date desc
            """ % (user_id, blog.id)

        blog.comments = comment_model.objects.raw(sql)
    return blogs
分别用sql语句获取评论和回复的统计数量。
get_comments_count方法,获取指定用户的评论数;
get_replies_count方法,获取指定用户回复其他人的数量;
get_to_reply_count方法,获取指定用户被回复的次数;
last_talk_about方法,获取最后一个参与评论或回复的博文;
all_talk_about方法,获取所有评论和回复。
这里需要稍微说明一下的是all_talk_about方法。用模型对象的raw方法获取相关对象。但它是一个生成器,为了方便关联相关的评论和回复,我就先将其转行成list,再动态添加一个comments属性用于存放相关的评论和回复。
再修改一下,user_ex的拓展方法views.py文件,加上如下代码:
from helper import comments_count

#添加用户中心的响应方法
def user_info(request):
    '''show the user infomations'''
    data={}
    user = request.user
    #判断是否登录了
    if request.user.is_authenticated():
        data['user'] = user
        data['comments_count'] = comments_count.get_comments_count(user.id)
        data['replies_count'] = comments_count.get_replies_count(user.id)
        data['replyed_count'] = comments_count.get_to_reply_count(user.id)
        data['last_talk_about'] = comments_count.last_talk_about(user.id)
        data['all_talk_about'] = comments_count.all_talk_about(user.id)
        return render_to_response('user/index.html',data)
    else:
        data['message'] = u'您尚未登录,请先登录' #提示消息
        data['goto_page'] = True #是否跳转
        data['goto_url'] = '/'  #跳转页面
        data['goto_time'] = 3000  #等待多久才跳转
        return render_to_response('message.html',data)

#修改检查是否登录的代码
def check_is_login(request):
    """check the user is logined"""
    if request.user.is_authenticated():
        #change 2016-5-20
        username = request.user.first_name or request.user.username
        active_state = '' if request.user.is_active else u'(未激活)'
        admin_url = u'<li><a href="%s">后台管理</a></li>' % reverse('admin:index') if request.user.is_superuser else ''

        returnText=u'''
            <li role="presentation" class="dropdown">
                <a class="dropdown-toggle" data-toggle="dropdown" href="#" role="button" aria-haspopup="true" aria-expanded="false">
                    您好,%s%s <span class="caret"></span>
                </a>

                <ul class="dropdown-menu">
                    <li><a href="%s">用户中心</a></li>
                    %s
                    <!--<li role="separator" class="divider"></li>-->
                    <li><a href="%s">退出</a></li>
                </ul>
            </li>''' % (username, active_state,
                reverse('user_info'),
                admin_url,
                reverse('user_logout'))
    else:
        returnText=u"""
            <li><a href="#" data-toggle="modal" data-target="#LoginModal">登录</a></li>
            <li><a href="#" data-toggle="modal" data-target="#RegModal">注册</a></li>"""
    return HttpResponse(returnText, content_type='application/javascript')
加了处理响应的方法,别忘了加上url的设置。
url(r'^user_info$','user_ex.views.user_info',name='user_info'),
这里用到了两个模版,一个是正常的用户中心模版,一个是没有登录用到的消息提醒模版。
用户中心模版:
{% extends "base.html" %}
{% block title %}用户中心 - 杨仕航的博客{% endblock %}
{% block blog_active %}active{% endblock %}
{% block content %}
<div class="row">
<div class="col-md-5">
<div class="panel panel-default">
<div class="panel-heading">我的信息</div>
<div class="panel-body">
<div class="">
<h4 class="user-name">{% if user.first_name %}{{user.first_name}}{%else%}{{user.username}}{%endif%}</h4>
<span><a href="#">修改昵称</a></span>
<span><a href="#">修改密码</a></span>
</div>
<ul class="user-info">
<li>
<span>注册邮箱:</span>
<span>{{user.username}}</span>
</li>
<li>
<span>注册日期:</span>
<span>{{user.date_joined|date:"Y-m-d H:i"}}</span>
</li>
<li>
<span>最近登录:</span>
<span>{{user.last_login|date:"Y-m-d H:i"}}</span>
</li>
</ul>
</div>
</div>
</div>
<div class="col-md-7">
<div class="panel panel-default">
<div class="panel-heading">我的足迹</div>
<div class="panel-body">
<div class="">
<h4 class="user-name">信息统计</h4>
<span>最近参与讨论的文章:
{% if last_talk_about %}
<a href="/blog/{{last_talk_about.id}}" target="_blank">{{last_talk_about.caption}}</a>
{% else %}
无
{% endif %}
</span>
</div>
<ul class="user-info">
<li>您共评论了<b>{{comments_count}}</b>次</li>
<li>您共回复了<b>{{replies_count}}</b>次</li>
<li>有<b>{{replyed_count}}</b>次,其他人回复了您</li>
</ul>
</div>
</div>
</div>
<div class="col-md-12">
<div class="panel panel-default">
<div class="panel-heading">我的发言</div>
<div class="panel-body">
{% for blog in all_talk_about %}
<div class="sp-item">
<h5 class="sp-title"><a href="/blog/{{blog.id}}" target="_blank">{{blog.caption}}</a></h5>
<ul class="sp-detail">
{% for comment in blog.comments %}
<li>{{comment.submit_date|date:"Y-m-d H:i"}}
{% if comment.root_id %}回复 <span class="label label-primary">{{comment.reply_name}}</span>{%else%}评论{%endif%}:
{{comment.comment}}</li>
{% endfor %}
</ul>
</div>
{% endfor %}
<p class="text-right">查看更多博文发表您的宝贵意见吧~ <a href="/blog/" target="_blank">看博客>></a></p>
</div>
</div>
</div>
</div>
</div>
<style type="text/css">
.user-info{
margin-top: 1em;
}
.sp-item{
margin-bottom: 2em;
border-bottom: 1px #ccc dashed;
}
.sp-item li{
text-indent: 1em;
padding-bottom: 0.3em;
}
</style>
{% endblock %}消息提醒模版:
{% extends "base.html" %}

{% block title %}杨仕航的博客{% endblock %}

{% block content %}
    {#显示消息的页面#}
    <div class="row">
        <center><h4 style="line-height:300%;">{{message|safe}}</h4></center>
    </div>
{% endblock %}

{% block extra_footer %}
    <script type="text/javascript">
        {#页面调整控制#}
        {% if goto_page %}
            $(function(){
                window.setTimeout(function(){
                    window.location = '{{goto_url}}';
                },{{goto_time}});
            });
        {% endif %}
    </script>
{% endblock %}
这样,登录之后,可以在用户名的下拉列表进入用户中心。接下来要添加修改昵称和修改密码功能。