关于本站
1、基于Django+Bootstrap开发
2、主要发表本人的技术原创博客
3、本站于 2015-12-01 开始建站
有较长时间没有更新关于我的网站搭建的博客,因为我在调整代码、整合功能。有人反馈有时评论和注册收不到邮件,准备去掉注册一定要绑定邮箱的功能,并加上评论和回复之后站内消息通知功能。这些功能需要修改大量代码,任重而道远。
站内通知使用django-notifications-hq第三方库。执行如下命令安装django-notifications-hq:
pip install django-notifications-hq
执行命令后,安装3个库。对应名称和版本如下,若你测试代码有问题,请参考最新帮助文档或源码:
1)django-model-utils=3.0.0
2)django-notifications-hq=1.2
3)jsonfield=2.0.1
可以在Python安装目录Lib/site-packages找到notifications。以下开发基本都是查看notifications源码和其Github的帮助。网上的文章还是抄来抄去,毫无新意和用处。
接着,打开Django项目的settings.py文件,在INSTALLED_APPS加入该应用:
INSTALLED_APPS = [
    # ... 其他省略不写
    'notifications',
]
再更新数据库,由于notifications已经makemigrations了,直接migrate更新同步数据库:
python manage.py migrate notifications
再打开urls.py总路由设置,添加notifications的urls(貌似不加也行,我没有使用到)
url(r'^notifications/', include('notifications.urls')),当然,不止在评论或回复时才发送消息通知。可以在任何地方发送消息通知,例如用户注册成功、用户第一次登录等等。主要看你的需求,基本原理都一样,我以django-comments库评论或回复作为例子。相关的django-comments开发可参考Django评论库开发专题。
此处不建议直接修改评论库提交评论的代码,可使用signals机制处理消息通知。
signals是Django一套信号机制,模型对象操作会产生一系列的信号。例如保存前、保存后。Django自动监控到这些信号会执行对应的代码。故,打开django-comments库的signals.py文件,在其中添加评论提交之后的处理代码。
django-comments库的路径同样在Python安装目录的Lib/site-packages中。由于我对该库修改比较多,已经复制全部代码到我的Django项目中。打开signals.py文件,可发现已经定义好了3个signals信号器。
#coding:utf-8
from django.dispatch import Signal

comment_will_be_posted = Signal(providing_args=["comment", "request"])
comment_was_posted = Signal(providing_args=["comment", "request"])
comment_was_flagged = Signal(providing_args=["comment", "flag", "created", "request"])
其中,comment_was_posted是评论保存之后监控的信号。我们将使用该信号,在该文件添加如下代码:
#coding:utf-8
from django.dispatch import receiver
from django.shortcuts import get_object_or_404
from notifications.signals import notify

try:
    from django.apps import apps
except ImportError:
    from django.db import models as apps

from .models import Comment
from . import get_model

@receiver(comment_was_posted, sender=Comment)
def send_message(sender, **kwargs):
    # 获取相关数据
    #print(kwargs)
    comment = kwargs['comment']
    request = kwargs['request']
    user = comment.user
    username = user.first_name or user.username

    # 获取评论的对象
    data = request.POST.copy()
    ctype = data.get("content_type")
    object_pk = data.get("object_pk")
    model = apps.get_model(*ctype.split(".", 1))
    target = model._default_manager.using(None).get(pk=object_pk)

    # 判断是评论还是回复,设置消息标题
    if int(comment.root_id) == 0:
        # 评论对象(博客,专题)
        content_object = comment.content_type.get_object_for_this_type(id=object_pk)
        recipient = content_object.author  # 被评论时,通知文章作者
        verb = u'[%s] 评论你了' % username
    else:
        # 被回复
        reply_to = get_object_or_404(get_model(), id=comment.reply_to)
        recipient = reply_to.user  # 被回复时,通知评论者
        verb = u'[%s] 回复你了' % username

    # 发送消息(level: 'success', 'info', 'warning', 'error')
    message = {}
    message['recipient'] = recipient            # 消息接收人
    message['verb'] = verb                      # 消息标题
    message['description'] = comment.comment    # 评论详细内容
    message['target'] = target                  # 目标对象
    message['action_object'] = comment          # 评论记录
    notify.send(user, **message)
这部分的代码是整个站内消息通知的核心。一部分一部分拆分讲解。
首先,signals的结构。receiver是绑定处理信号的方法,sender是该信号的发送者。基本结构如下:
@receiver(comment_was_posted, sender=Comment)
def send_message(sender, **kwargs):
    print(kwargs)  # 打印参看有哪些参数
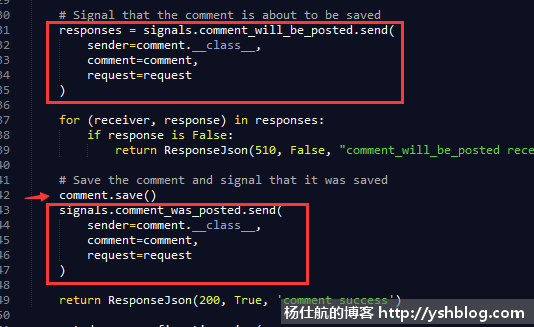
可以打印kwargs查看有哪些参数。或者你可以查看该库的views/comments.py文件中的post_comment方法。在该方法的末尾可看到发送信号的代码:

从上图可看到评论保存前后各发送(send)两个信号。保存之后发送的signal参数有sender、comment、request。我们可以根据comment和request得到我们所需的数据。
在signals中获取被评论的对象就是通过comment获取,当然该代码不是我写的,参考comments.py的post_comments方法。
至于判断评论还是回复这部分代码可以忽略,这个是我修改django-comments库加入回复功能。
最后部分的代码,notify.send同样使用了signals。使用notifications的signals,可打开notifications源码查看。而前面的message中的数据都是notify所需的数据。这些参数不是都必须的,可根据自己项目的实际需求使用。记录target是为了知道评论哪篇博客;记录action_object是为了将评论和消息一一对应,才可根据评论对象找到对应的消息对象。
上面的参数recipient是希望谁接到通知。notifications是和Django的用户系统绑定。若settings设置了AUTH_USER_MODEL,也自动使用自定义的用户系统。可通过User获取该用户相关的消息,例如:
user = request.user
user.notifications.all()  # 全部消息
user.notifications.unread()  #未读消息
user.notifications.read()  #已读消息
还可在模版中使用模版标签获得未读消息数:
{% load notifications_tags %}
{% notifications_unread as unread_count %}

<span>你有{{unread_count}}条未读消息</span>
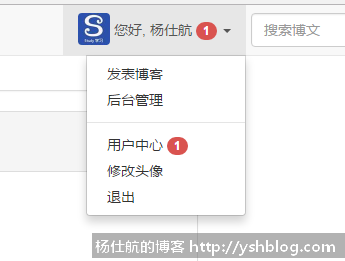
现需要将未读消息显示在导航栏的用户名旁边,如下所示:

问题我网站判断用户的登录状态是通过ajax加载页面之后判断的,非直接在底层模版中用模版标签判断。若同样在页面加载之后再通过ajax异步获取消息会很麻烦,代码耦合性较高。而模版页面用使用request.user,需要用render或render_to_reponse + RequestContext。例如:
from django.shortcuts import render_to_response
from django.template import RequestContext

return render_to_response('index.html', data, context_instance=RequestContext(request))
以上等同于:
from django.shortcuts import render

return render(request, 'index.html', data)
当然选择使用render,render相当于render_to_response的简写。若你代码也需要在模版页面使用request.user,最好也改成render方式。然后再模版页面判断获取未读消息数,例如:
{#判断是否有登录用户#}
{% if request.user.is_authenticated %}
    {% notifications_unread as unread_count %}
    <span>
        您好, {{request.user.username}}

        {#判断是否有未读消息#}
        {% ifnotequal unread_count 0 %}
            <span style="background-color:#d9534f">
                {{unread_count}}
            </span>
        {% endifnotequal %}
    </span>

    <ul class="dropdown-menu">
        {#如果是管理员#}
        {% if request.user.is_superuser %}
            <li><a href="{%url 'admin:index'%}">后台管理</a></li>
        {% endif %}

        <li>
            <a href="{%url 'user_info'%}">
                用户中心
                {% ifnotequal unread_count 0 %}
                    <span style="background-color:#d9534f">
                        {{unread_count}}
                    </span>
                {% endifnotequal %}
            </a>
        </li>
        <li><a href="{%url 'user_logout'%}">退出</a></li>
    </ul>

{% else %}
    <a href="/user/login_page">登录/注册</a>
{% endif %}
上面的{%url 'user_info'%}是进入我网站的用户中心页面。可在其中显示未读消息和已读消息,这里简单实现,先显示最多30条未读消息。
首先需要修改或者新增user_info对应的响应方法返回未读消息。核心代码如下:
user = request.user
unread = user.notifications.unread()[:30]

data={}
data['unread_list'] = unread  # 返回未读消息
对应的模版页面再处理unread_list,列举未读消息。
<div class="unread_head">
<span>您共有{{unread_list.count}}条未读消息</span>
<a class="btn btn-info unread_btn"
href="{%url 'user_mark_all_read'%}">
全部标记为已读
</a>
</div>
<ul class="unread_list">
{%for unread_item in unread_list%}
<li id="unread_{{unread_item.id}}">
<span>{{unread_item.timesince}}前 > </span>
<a href="{{unread_item.target.get_url}}?notification={{unread_item.id}}#F{{unread_item.action_object.id}}">
{{unread_item.verb}}
</a>
<p class="unread_descript">{{unread_item.description}}</p>
</li>
{%endfor%}
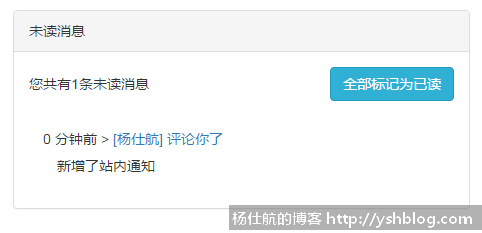
</ul>这个模版页面也是我反复测试调整的结果,里面有些参数需要一一讲解。效果如下:

先看for循环部分。timesince属性是获取该消息是多久之前的消息;verb和description分别是消息的简要标题和内容;target是前面创建消息绑定的对象(博客或专题)。为了方便获取具体链接,在博客和专题的model类中分别加入获取具体对象的链接方法:
from django.core.urlresolvers import reverse  # url逆向解析

class Blog(models.Model):
    # 其余代码省略
    pass

    # 获取博客明细链接(根据具体情况写链接解析即可)
    def get_url(self):
        return reverse('detailblog', kwargs={'id':self.id})
大家可否发现,这个有两个链接user_mark_all_read和for循环中复杂的链接。如下讲解。
先看看上面for循环中构造的链接。该链接是消息具体指向位置。
由于我这里是评论或回复的通知消息,所以消息最终要指向评论或回复的具体位置。原本评论在邮件通知的链接如下:
http://yshblog.com/subject/3#F168
#号前半部分是具体页面;F168是执行评论的锚点位置,在打开页面中得到该值并定位到评论位置。
当你打开该页面,需要修改本条未读消息为已读消息状态。
而在后台我接受不到#号后面的内容。于是在链接加入GET请求的参数notification,通过该参数获取具体的消息并修改消息状态。
那什么地方处理修改消息状态呢?当然是打开具体的博客或专题的处理方法中修改。为了不重复写冗余代码,我将修改消息状态的代码写成装饰器:
#coding:utf-8
from notifications.models import Notification

# 修改未读消息为已读装饰器
def notifications_read(func):
    def wrapper(request, *args, **kwargs):
        print(request.get_full_path())
        notify_key = 'notification'
        if request.GET.has_key(notify_key):
            try:
                # 获取消息
                notify_id = int(request.GET[notify_key])
                notify = Notification.objects.get(id=notify_id)

                # 标记为已读
                notify.unread = False
                notify.save()
            except ValueError:
                # int转换错误,不处理
                pass
            except Notification.DoesNotExist:
                # 消息不存在,不处理
                pass
        return func(request, *args, **kwargs)
    return wrapper
再对应的处理方法上加该装饰器,例如博客的具体页面处理方法:
@notifications_read
def blog_detail(request, id):
    # 博客响应方法的代码非主要,省略
    pass
还有上面有个user_mark_all_read链接,该链接是将所有未读消息修改为已读消息。对应响应方法如下:
#coding:utf-8
from django.http import HttpResponseRedirect
from django.core.urlresolvers import reverse # url逆向解析

def user_mark_all_read(request):
    user = request.user
    notifies = user.notifications.all()
    notifies.mark_all_as_read()  # 标记所有未读为已读
    return HttpResponseRedirect(reverse('user_info'))  # 重定向回用户中心
此处偷了一下懒,直接重定向回用户中心页面。请根据具体项目细节写代码。
还有个问题,之前通过邮件发送评论通知。其中的链接也需要加入notification参数,让用户打开具体页面时修改消息状态。
这时候需要用到前面创建消息使用的action_object了。前面将评论和消息通过该对象一一对应关联,所以在发送邮件通知的时候,通过评论id获取对应的消息通知id。若你也和我使用同样的逻辑机制,可参考如下代码:
from notifications.models import Notification
from django.contrib.contenttypes.models import ContentType

# 此处已经有comment对象和具体页面的链接src_url可使用

#判断评论是否有对应的消息通知(一条评论对应一条消息)
comment_content_type_id = ContentType.objects.get_for_model(comment).id
notifies = Notification.objects.filter(\
                action_object_content_type_id=comment_content_type_id, \
                action_object_object_id=comment.id)

# 构造链接
if notifies.count() > 0:
    comment_url = u'%s?notification=%s#F%s' % (src_url, notifies[0].id, comment.id)
else:
    comment_url = u'%s#F%s' % (src_url, comment.id)
ps:发送邮件的代码也可放到signals.py中。
相关专题: Django评论库开发
zhaixuyan05231
测试消息通知
2019-01-06 13:48 回复
GentleCP
航哥建这样一个个人网站大概要化多少时间啊
2019-05-02 15:56 回复