关于本站
1、基于Django+Bootstrap开发
2、主要发表本人的技术原创博客
3、本站于 2015-12-01 开始建站
久等了,Django-Comments评论库的回复功能写出来了。这个功能对comments库改动还是有点大的。
首先先找到该评论库的位置。这个一般在python安装目录下的Lib/site-packages文件夹里面。我用的是WebFaction服务器,comments评论库的具体路径是"~/lib/python2.7/django_contrib_comments-1.6.2-py2.7.egg/django_comments/"
目录结构如下,为了更好讲解我是如何修改这个comments评论库,稍微说一下相关文档的作用:

1、目录templatetags是comments库的自定义标签处理的文件夹
2、文件templatetags/comments.py 包含自定义标签的处理方法
3、目录views是comments库的相关响应方法
4、文件views/comments.py 包括评论库的主要处理方法
5、文件models.py 评论库的模型文件
6、文件admin.py 评论库的admin界面显示内容
这个回复功能具体以怎样的形式展现出来,这个我想了好多天。既要友好,又要处理方便,不容易。大概最终界面如下:
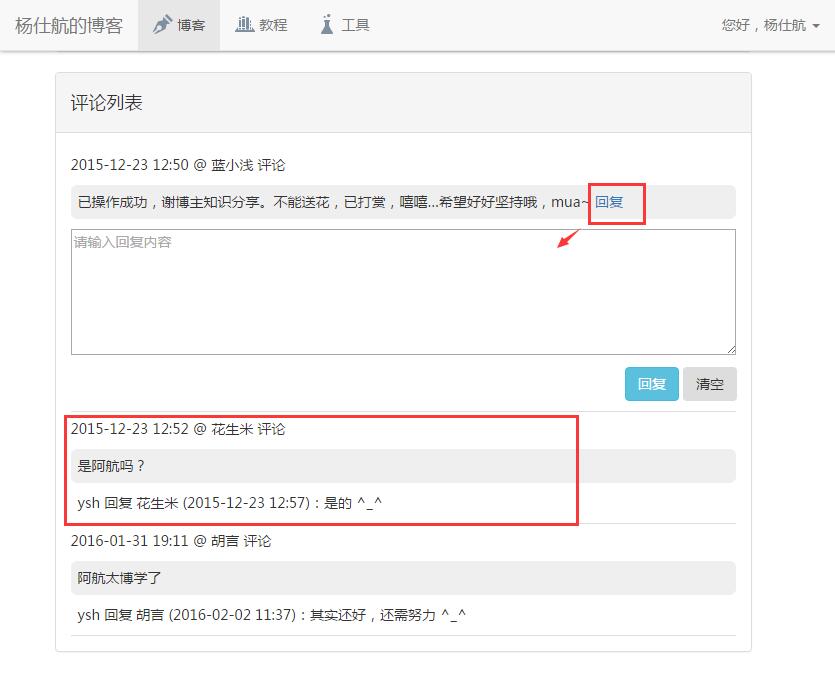
1、评论和回复区分来,评论深色显示,回复浅色显示并所有相关回复放置在对应的评论下方;
2、鼠标移动到评论或者回复上面就会显示一个“回复”的链接,点击则在下方出现回复框。
要实现这些功能,需要改动很多东西。我总结一下,免得讲解的时候,出现混乱现象:
1、修改comments库的模型结构,为了区分哪些是评论,哪些是回复,以及回复对应哪个评论
2、修改了模型结构,就需要修改admin界面的显示
3、修改评论和回复提交时对应的处理方法,确保很够正确写入数据库中
4、修改comments库的自定义标签,让回复内容能够在前端页面显示出来
5、前端页面添加提交回复的方法和动作处理等
大概是这5点,内容有点多。接下来一一给大家讲解comments库是如何实现回复功能的。
1、修改comments的模型
打开comments库的models.py文件,在CommentAbstractModel类里面加入3个字段
特别说明!我用的comments库版本是1.6.2。后面的出了新版本,CommentAbstractModel类不在models.py文件中。不过可以从models.py的import语句找到来自哪个文件。
新版本comments库的CommentAbstractModel类放在models.py同个目录下的abstracts.py文件中。
@python_2_unicode_compatible
class CommentAbstractModel(BaseCommentAbstractModel):
    """
    A user comment about some object.
    """

    # Who posted this comment? If ``user`` is set then it was an authenticated
    # user; otherwise at least user_name should have been set and the comment
    # was posted by a non-authenticated user.
    user = models.ForeignKey(settings.AUTH_USER_MODEL, verbose_name=_('user'),
                             blank=True, null=True, related_name="%(class)s_comments")
    user_name = models.CharField(_("user's name"), max_length=50, blank=True)
    # Explicit `max_length` to apply both to Django 1.7 and 1.8+.
    user_email = models.EmailField(_("user's email address"), max_length=254,
                                   blank=True)
    user_url = models.URLField(_("user's URL"), blank=True)

    comment = models.TextField(_('comment'), max_length=COMMENT_MAX_LENGTH)

    # Metadata about the comment
    submit_date = models.DateTimeField(_('date/time submitted'), default=None, db_index=True)
    ip_address = models.GenericIPAddressField(_('IP address'), unpack_ipv4=True, blank=True, null=True)
    is_public = models.BooleanField(_('is public'), default=True,
                                    help_text=_('Uncheck this box to make the comment effectively '
                                                'disappear from the site.'))
    is_removed = models.BooleanField(_('is removed'), default=False,
                                     help_text=_('Check this box if the comment is inappropriate. '
                                                 'A "This comment has been removed" message will '
                                                 'be displayed instead.'))
    #reply fields
    root_id = models.IntegerField(default=0)
    reply_to = models.IntegerField(default=0)
    reply_name = models.CharField(max_length=50, blank=True)

    # Manager
    objects = CommentManager()
这个类后面内容比较多,我就拿关键的部分。这3个字段分别是root_id, reply_to, reply_name。
root_id:这个字段是标记回复的一开始是哪个评论。因为回复也可能回复其他人的回复,这些回复都会放在一个评论下面,所以就加这个字段标记一下。
reply_to: 这个字段就是直接标记回复哪个评论或者回复了。
reply_name: 回复哪个评论或者回复的帐号名。虽然这个账号名和通过comment对象获取找到对应的名称,但这个需要写比较多的代码,还是直接写到数据库中,方便获取。
修改了模型结构,记得更新一下数据库!
2、修改admin显示
打开comments库的admin.py文件,找到CommentsAdmin类,修改list_display,加入刚刚3个字段即可。
list_display = ('id', 'reply_to', 'name', 'content_type', 'object_pk', 'ip_address', 'submit_date', 'is_public', 'is_removed')3、修改评论和回复提交的处理方法
这个改动就比较多了,因为我还把是否登录用户和用户是否注册的判断加入进来。然后处理结果用json数据结构返回。
打开comments库的views/comments.py文件,主要修改post_comment方法。我把这个文件添加和修改的东西写出来。
#coding:utf-8
#添加这两个引用,为了返回json数据
from django.http import HttpResponse
import json

#添加返回json的方法,json结构有3个参数(code:返回码,is_success:是否处理成功,message:消息内容)
def ResponseJson(code, is_success, message):
    data = {'code':code, 'success':is_success, 'message':message}
    return HttpResponse(json.dumps(data), content_type="application/json")

@csrf_protect
@require_POST
def post_comment(request, next=None, using=None):
    """
    Post a comment.

    HTTP POST is required. If ``POST['submit'] == "preview"`` or if there are
    errors a preview template, ``comments/preview.html``, will be rendered.
    """
    # Fill out some initial data fields from an authenticated user, if present
    data = request.POST.copy()
    if request.user.is_authenticated():
        if not data.get('name', ''):
            data["name"] = request.user.get_full_name() or request.user.get_username()
        if not data.get('email', ''):
            data["email"] = request.user.email
    #change 2016-04-11
    else:
        return ResponseJson(501, False, 'No Login')

    #change 2016-05-11
    if not request.user.is_active:
        response_data = {'code':502, 'success':False, 'message':'No Active'}
        return ResponseJson(502, False, 'No Active')

    # Look up the object we're trying to comment about
    ctype = data.get("content_type")
    object_pk = data.get("object_pk")
    if ctype is None or object_pk is None:
        #return CommentPostBadRequest("Missing content_type or object_pk field.")
        return ResponseJson(503, False, 'Missing content_type or object_pk field.')
    try:
        model = apps.get_model(*ctype.split(".", 1))
        target = model._default_manager.using(using).get(pk=object_pk)
    except TypeError:
        #return CommentPostBadRequest(
        #    "Invalid content_type value: %r" % escape(ctype))
        return ResponseJson(504, False, "Invalid content_type value: %r" % escape(ctype))
    except AttributeError:
        #return CommentPostBadRequest(
        #    "The given content-type %r does not resolve to a valid model." % escape(ctype))
        return ResponseJson(505, False,
            "The given content-type %r does not resolve to a valid model." % escape(ctype))
    except ObjectDoesNotExist:
        #return CommentPostBadRequest(
        #    "No object matching content-type %r and object PK %r exists." % (
        #        escape(ctype), escape(object_pk)))
        return ResponseJson(506, False,
            "No object matching content-type %r and object PK %r exists." % (escape(ctype),
                escape(object_pk)))
    except (ValueError, ValidationError) as e:
        #return CommentPostBadRequest(
        #    "Attempting go get content-type %r and object PK %r exists raised %s" % (
        #        escape(ctype), escape(object_pk), e.__class__.__name__))
        return ResponseJson(507, False,
            "Attempting go get content-type %r and object PK %r exists raised %s" % (escape(ctype),
                escape(object_pk), e.__class__.__name__))

    # Do we want to preview the comment?
    preview = "preview" in data

    # Construct the comment form
    form = django_comments.get_form()(target, data=data)

    # Check security information
    if form.security_errors():
        #return CommentPostBadRequest(
        #    "The comment form failed security verification: %s" % escape(str(form.security_errors())))
        return ResponseJson(508, False, "The comment form failed security verification: %s" % escape(str(form.security_errors())))

    # If there are errors or if we requested a preview show the comment
    if form.errors or preview:
        template_list = [
            # These first two exist for purely historical reasons.
            # Django v1.0 and v1.1 allowed the underscore format for
            # preview templates, so we have to preserve that format.
            "comments/%s_%s_preview.html" % (model._meta.app_label, model._meta.model_name),
            "comments/%s_preview.html" % model._meta.app_label,
            # Now the usual directory based template hierarchy.
            "comments/%s/%s/preview.html" % (model._meta.app_label, model._meta.model_name),
            "comments/%s/preview.html" % model._meta.app_label,
            "comments/preview.html",
        ]
        #return render(request, template_list, {
        #        "comment": form.data.get("comment", ""),
        #        "form": form,
        #        "next": data.get("next", next),
        #    },
        #)
        return ResponseJson(509, False, form.data.get("comment", ""))

    # Otherwise create the comment
    comment = form.get_comment_object()
    comment.ip_address = request.META.get("REMOTE_ADDR", None)

    #change 2016-05-12
    comment.root_id = data.get('root_id',0)
    comment.reply_to = data.get('reply_to',0)
    comment.reply_name = data.get('reply_name','')

    if request.user.is_authenticated():
        comment.user = request.user

    # Signal that the comment is about to be saved
    responses = signals.comment_will_be_posted.send(
        sender=comment.__class__,
        comment=comment,
        request=request
    )

    for (receiver, response) in responses:
        if response is False:
            #return CommentPostBadRequest(
            #    "comment_will_be_posted receiver %r killed the comment" % receiver.__name__)
            return ResponseJson(510, False,
                "comment_will_be_posted receiver %r killed the comment" % receiver.__name__)

    # Save the comment and signal that it was saved
    comment.save()
    signals.comment_was_posted.send(
        sender=comment.__class__,
        comment=comment,
        request=request
    )

    #change 2016-05-12
    #return next_redirect(request, fallback=next or 'comments-comment-done',
    #                     c=comment._get_pk_val())
    return ResponseJson(200, True, 'comment success')
其中加入了登录检查判断和激活判断,修改原本的出错信息用json返回。基本修改的部分用#change注释标记,原有的代码也注释起来。我用的django版本是1.6,你可能是新版本,有所不同。
也许代码太多了,也不要忽略 comment.root_id = data.get('root_id',0),这个是把我们前面加的字段写入数据。
4、修改自定义标签,获取内容
仔细研究了一下,前端页面获取评论内容是用自定义标签获取,简单示例如下:
{% get_comment_list for blog as comments %}
{% for comment in comments %}
    {#评论内容#}
    {{comment.submit_date|date:"Y-m-d H:i"}} @ {{comment.user_name}} 评论
    {{ comment.comment }}
{% empty %}
    暂无评论
{% endfor %}
用get_comment_list标签获取,再循环处理。
打开comments库的templatetags/comments.py文件。找到BaseCommentNode类的get_queryset方法。该方法就是get_comment_list自定义标签获取所有评论的方法。
我把这个方法修改如下,同样用#change标记我修改的地方:
def get_queryset(self, context):
    ctype, object_pk = self.get_target_ctype_pk(context)
    if not object_pk:
        return self.comment_model.objects.none()

    qs = self.comment_model.objects.filter(
        content_type=ctype,
        object_pk=smart_text(object_pk),
        site__pk=settings.SITE_ID,
        root_id=0, #change
    )

    # The is_public and is_removed fields are implementation details of the
    # built-in comment model's spam filtering system, so they might not
    # be present on a custom comment model subclass. If they exist, we
    # should filter on them.
    field_names = [f.name for f in self.comment_model._meta.fields]
    if 'is_public' in field_names:
        qs = qs.filter(is_public=True)
    if getattr(settings, 'COMMENTS_HIDE_REMOVED', True) and 'is_removed' in field_names:
        qs = qs.filter(is_removed=False)
    if 'user' in field_names:
        qs = qs.select_related('user')

    #change : get sub comments
    for q in qs:
        q.replies=self.comment_model.objects.filter(
            content_type=ctype,
            object_pk=smart_text(object_pk),
            site__pk=settings.SITE_ID,
            root_id=q.id,
            is_public=True,
            is_removed=False,
        ).order_by('submit_date')
    return qs
其中,self.comment_model是评论模型的对象,通过这个对象获取内容。第1个修改的地方是给第1次获取评论的地方加上条件 root_id=0,这样获取到的记录都是评论。
第2个修改的地方在该方法末尾。循环遍历所有相关评论,获取对应的回复。这里利用python的语音特性,动态加了replies属性,该属性用于获取该评论的所有回复。
修改完成之后,就可以修改前端页面了。
{% get_comment_list for blog as comments %}
{% for comment in comments %}
    <div class="blog_comment" name="F{{comment.id}}">
        <p class="comment_title">
            {{comment.submit_date|date:"Y-m-d H:i"}} @ {{comment.user_name}} 评论
        </p>
        <p class="comment_content"
           root='{{comment.id}}'
           role='{{comment.id}}'
           base='{{comment.user_name}}'>
           {{ comment.comment }}
        </p>

        <ul class="comment_reply">
            {% for reply in comment.replies %}
                <li root='{{reply.root_id}}'
                    role='{{reply.id}}'
                    base='{{reply.user_name}}'>
                    {{reply.user_name}} 回复 {{reply.reply_name}} ({{ reply.submit_date|date:"Y-m-d H:i"}}):{{ reply.comment }}
                </li>
            {% endfor %}
        </ul>
    </div>

{% empty %}
    暂无评论
{% endfor %}
遍历两次,第1次获取评论,第2次获取对应的回复。
5、前端页面加上回复功能
后台的代码都写好了,现在只需要再修改前端页面的显示和处理即可。
首先,修改显示的样式,这个我只是简单区分评论和回复而已。
/*评论*/
.blog_comment{
    border-bottom: 1px solid #ddd;
}
.blog_comment .comment_title{
    margin-top: 0.5em;
}
.blog_comment .comment_content{
    padding: 0.5em;
    border-radius: 6px;
    background-color: #efefef;
}
/*回复*/
.blog_comment .comment_reply{
    text-indent: 0.5em;
}
回复需要一个地方写内容,所以需要加一个回复框:
<div id="reply_form" style="display:none;text-indent:0;">
    <!--这里需要get_comment_form 这句话,若前面评论部分你有定义就结合一下修改-->
    {% get_comment_form for blog as blog_form %}
    <form action="#" id="reply_update_form">
        {% csrf_token %}
        {{ blog_form.object_pk }}
        {{ blog_form.content_type }}
        {{ blog_form.timestamp }}
        {{ blog_form.site }}
        {{ blog_form.submit_date }}
        {{ blog_form.security_hash }}
        <input type="hidden" name="next" value="{%url 'detailblog' blog.id%}"/>
        <input id="reply_to" type="hidden" name="reply_to" value="0" />
        <input id="root_id" type="hidden" name="root_id" value="0" />
        <input id="reply_name" type="hidden" name="reply_name" value="">

        <div class="row">
            <div class="col-md-12">
                <textarea class="input-xlarge comment_text" id="id_comment_reply" name="comment" placeholder="请输入回复内容"></textarea>

                <!--如果你在该字段中输入任何内容,你的评论就会被视为垃圾评论-->
                <input type="text" style="display:none;" id="id_honeypot_reply" name="honeypot">
            </div>
        </div>

        <div class="row">
              <div class="form-actions comment_button">
                <input class="btn btn-info" id="submit_reply" type="submit" name="submit" value="回复"/>
                <input class="btn" id="reset_btn" type="reset" name="submit" value="清空"/>
              </div>
        </div>
    </form>
</div>
最后,再写js代码(引用了jQuery库)。用ajax提交回复内容。
$(document).ready(function() {
//绑定回复提交事件
$('#reply_update_form').submit(function() {
    if ($("#id_honeypot_reply").val().length!=0) {alert("Stop!垃圾评论");return false;};
    if ($("#id_comment_reply").val().length==0) {alert("Error:请输入您的回复内容");$("#id_comment").focus();return false;};

    $("#id_timestamp").val(event.timeStamp);

    $.ajax({
        type: "POST",
        data: $('#reply_update_form').serialize(),
        url: "{% comment_form_target %}",
        cache: false,
        dataType: "json",
        success: function(json, textStatus) {
            if(json['success']){
                window.location.reload();
            }else{
                if(json['code']==501){
                    alert('您尚未登录,请先登录才能评论。');
                }else if(json['code']==502){
                    alert('您尚未激活,请先激活您的账户才能评论。');
                }else{
                    alert('评论出错,请刷新重试\n'+json['message']);
                }
            }
        },
        error: function (XMLHttpRequest, textStatus, errorThrown) {
            alert("评论出错\n请检查是否登录了或者刷新试试\n" + errorThrown);
        }
    });
    return false;
});

//绑定回复按钮的鼠标经过事件
$(".comment_content,.comment_reply li").each(function(){
    $(this).hover(function(){
        $(this).append("<span class='reply_button'> <a href='javascript:void(0);' onclick='reply_click(this);'>回复</a></span>");
    },function(){
        $(this).children(".reply_button").remove();
    });
});
});

//回复按钮点击触发的方法
function reply_click(obj){
    //获取回复按钮对应的评论或回复(DOM转成jQuery对象)
    var comment=obj.parentElement.parentElement;
    var $c=$(comment);
    //获取相关信息
    var root=$c.attr("root");
    var role=$c.attr("role");
    var base=$c.attr("base");

    //显示回复面板
    $("#reply_form").hide();
    $c.after($("#reply_form"));
    $("#reply_form").slideDown(200);

    //设置回复表单相关值
    $("#reply_to").val(role);
    $("#root_id").val(root);
    $("#reply_name").val(base);
    return false;
}
之前,写的评论ajax提交也需要修改一下,因为现在返回的内容是json数据格式。参照回复处理返回结果即可,一样的代码。这样就为Django的comments评论库添加回复功能了。
Django开发网站的博文越来越多了,我有个录制视频的想法。等我后面有时间了,再尝试一下 ^_^。
多谢Jackson指出我博文中的纰漏之处,我已经修正。欢迎给我建议 ^_^
相关专题: Django评论库开发