关于本站
1、基于Django+Bootstrap开发
2、主要发表本人的技术原创博客
3、本站于 2015-12-01 开始建站
前面开发了QQ登录、新浪微博登录两个功能,被他们写的帮助文档和开发流程弄得无力吐槽。
这次开发Github第三方登录的功能,相当的顺畅,简直是一气呵成。没有冗余的环节,也没有都是弯路的API接口。
注意:本次开发的第三方登录功能很多代码都是基于前面写的第三方登录功能。有些地方若看不明白的话,请参考QQ登录、新浪微博登录。第三方登录的功能我只打算写QQ、新浪微博和Github这3个。
后面我再写一篇博文整理和优化代码并把完整的源码挂到Github上。
说明一下我前面已经做好的结构:
1)django中app名字: oauth;
2)模型:OAuth_ex(记录第三方账号和我网站用户绑定信息)和OAuth_type(记录OAuth账号类型);
3)OAuth功能封装类:在oauth应用目录下,创建了oauth_client.py文件,里面有OAuth_Base(基类)、OAuth_QQ(QQ的OAuth处理类)、OAuth_Sina(新浪的OAuth处理类);
4)绑定邮箱窗体:forms.py中BindEmail。
要在Github上开通OAuth,得先有1个Github账号。这个注册很简单,通常Github在程序猿都是人手一枚。
登录Github,进入个人账号的设置页面(Settings)。看下图,注册一个新的应用:
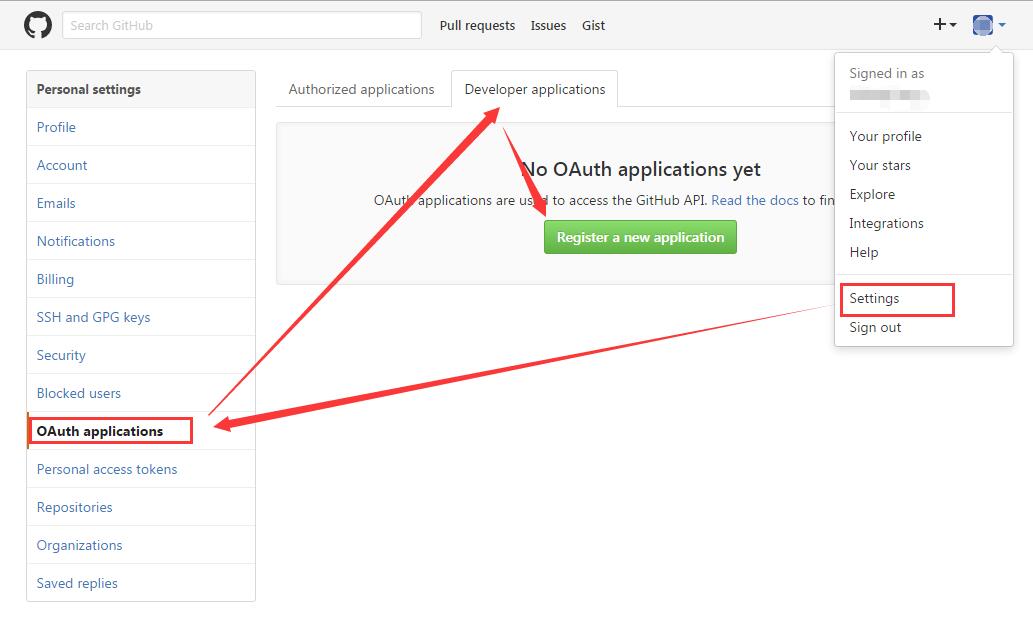
注册新的应用也很简单,只需要填写4个信息即可。不用写head头验证网站,也不用审核什么。清晰简单,效率又高。忍不住又想吐槽国内的QQ和新浪了。

填好上面这些信息之后,确认。就可以得到OAuth登录使用的ID和Secret。在这个页面可以上传网站的logo。

拿到ID和Secret之后,可以直接开发了,相当地便捷和清晰。我都不敢相信这就完成了开通OAuth。Github不用人工审核我的网站,剩下就是开发的事情了。
这里我单独放在一起讲,因为我前边也写两个第三方登录的博文。创建了一些模型。这里我不想再赘述,可以直接看看我前边写的新浪微博登录。
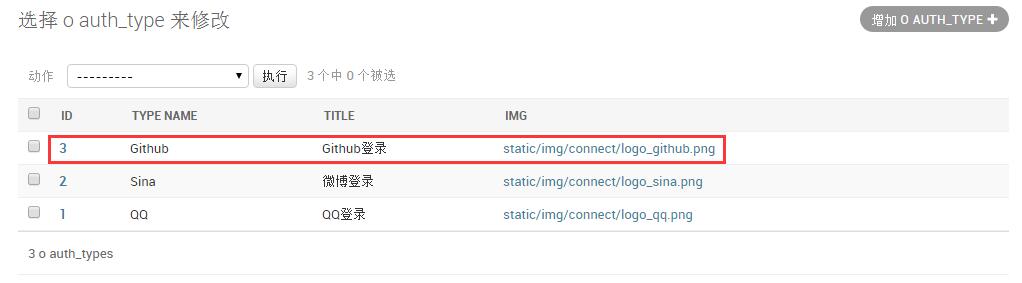
前边我为OAuth的类型创建了模型。需要先在后台添加一条记录:
另外,相关的OAuth设置,我都是放在settings.py文件中。加入如下设置项:
OAUTH_GITHUB_CONFIG = {
    'oauth_type_id' : 3,   #对应模型中记录的ID
    'oauth_type' : 'Github',

    'client_id' : 'xxxxxxxxxxx',
    'client_secret' : 'xxxxxxxxxx',
    'redirect_uri' : 'http://yshblog.com/oauth/github_check',#回调地址
    'scope' : 'user:email', #授权的权限
    'state' : 'Github',

    #其他请求的链接
    'url_authorize' : 'https://github.com/login/oauth/authorize',
    'url_access_token' : 'https://github.com/login/oauth/access_token',
    'url_open_id' : '',
    'url_user_info' : 'https://api.github.com/user',
    'url_email' : 'https://api.github.com/user/emails',
}
Github可以直接获取到用户的邮箱。对于我的网站用户是用邮箱注册的十分有用。QQ没有提供这个接口;新浪微博有提供,但是需要申请(我现在还申请没通过,嫌我的网站用户不够多)。
若需要获取用户邮箱,需要设置scope,请参考:https://developer.github.com/v3/oauth/#scopes
这里我还设置好验证、请求access_token、用户信息等接口的地址。这些可以在Github帮助中找到:https://developer.github.com/v3/auth/ 和 https://developer.github.com/guides/basics-of-authentication/
同样,OAuth在前面开发其他第三方登录的时候,初步集成为一个基类,不同的社交账号再继承基类。可参考新浪微博登录这篇博文。这里也不在赘述,后面我再写一篇博文整理一下。
OAuth基类:
#coding:utf-8
import json
import urllib, urllib2, urlparse
import re

class OAuth_Base():
    def __init__(self, kw):
        """self.oauth_type_id = kw.get('oauth_type_id', 0)
        self.oauth_type = kw.get('oauth_type', '')

        self.client_id = kw.get('client_id', '')
        self.client_secret = kw.get('client_secret', '')
        self.redirect_uri = kw.get('redirect_uri', '')
        self.scope = kw.get('scope', '')
        self.state = kw.get('state', '')

        self.url_authorize = kw.get('url_authorize', '')
        self.url_access_token = kw.get('url_access_token', '')
        self.url_open_id = kw.get('url_open_id', '')
        self.url_user_info = kw.get('url_user_info', '')
        self.url_email = kw.get('url_email', '')"""

        if not isinstance(kw, dict):
            raise Exception("arg is not dict type")

        for key, value in kw.items():
            setattr(self, key, value)

    def _get(self, url, data):
        """get请求"""
        request_url = '%s?%s' % (url, urllib.urlencode(data))
        response = urllib2.urlopen(request_url)
        return response.read()

    def _post(self, url, data):
        """post请求"""
        request = urllib2.Request(url, data = urllib.urlencode(data))
        response = urllib2.urlopen(request)
        #response = urllib2.urlopen(url, urllib.urlencode(data))
        return response.read()

    #根据情况重写以下方法
    def get_auth_url(self):
        """获取授权页面的网址"""
        params = {'client_id': self.client_id,
                  'response_type': 'code',
                  'redirect_uri': self.redirect_uri,
                  'scope': self.scope,
                  'state': self.state}
        return '%s?%s' % (self.url_authorize, urllib.urlencode(params))

    def get_access_token(self, code):
        """根据code获取access_token"""
        pass

    def get_open_id(self):
        """获取用户的标识ID"""
        pass

    def get_user_info(self):
        pass

    def get_email(self):
        pass
Github的OAuth类:
class OAuth_Github(OAuth_Base):
    openid = ''

    def get_access_token(self, code):
        params = {'grant_type': 'authorization_code',
                  'client_id': self.client_id,
                  'client_secret': self.client_secret,
                  'code': code,
                  'redirect_uri': self.redirect_uri}

        #Github此处是POST请求
        response = self._post(self.url_access_token, params)

        #解析结果
        result = urlparse.parse_qs(response, True)
        self.access_token = result['access_token'][0]
        return self.access_token

    def get_open_id(self):
        """获取用户的标识ID"""
        if not self.openid:
            #若没有openid,则调用一下获取用户信息的方法
            self.get_user_info()

        return self.openid

    def get_user_info(self):
        """获取用户资料信息"""
        params = {'access_token': self.access_token,}
        response = self._get(self.url_user_info, params)

        result = json.loads(response)
        self.openid = result.get('id', '')
        return result

    def get_email(self):
        """获取邮箱"""
        params = {'access_token': self.access_token,}
        response = self._get(self.url_email, params)

        result = json.loads(response)
        return result[0]['email']
这里其实是不需要get_open_id这个处理方法。为了和QQ、新浪微博保持一致,方便后面整理代码。
有了Github的相关处理方法之后,就可以实现验证和登录了。打开views.py,加入两个Github相关的处理方法:
#coding:utf-8
from django.http import HttpResponse,HttpResponseRedirect
from django.shortcuts import render_to_response, render
from django.core.urlresolvers import reverse #url逆向解析

from django.contrib.auth.models import User
from django.contrib.auth import logout,authenticate,login
from django.conf import settings

#OAuth应用相关模块
from oauth.oauth_client import OAuth_Github
from oauth.models import OAuth_ex, OAuth_type
from oauth.forms import BindEmail

#该引用是我自己的用户认证处理模块,可以参考http://yshblog.com/blog/38
from user_ex.views import get_active_code, send_active_email
import time
import uuid

def github_login(request):
    """登录前的认证"""
    oauth_github = OAuth_Github(settings.OAUTH_GITHUB_CONFIG)

    #获取 得到Authorization Code的地址
    url = oauth_github.get_auth_url()
    return HttpResponseRedirect(url)

def github_check(request):
    """登录之后,会跳转到这里"""
    request_code = request.GET.get('code')
    oauth_github = OAuth_Github(settings.OAUTH_GITHUB_CONFIG)

    #获取access_token
    try:
        access_token = oauth_github.get_access_token(request_code)
        time.sleep(0.05)    #稍微休息一下,避免发送urlopen的10060错误
    except Exception as e:
        data = {}
        data['message'] = u'登录出错,请稍后重试<br>(辅助信息%s)”' % str(e)
        data['goto_url'] = '/'
        data['goto_time'] = 3000
        data['goto_page'] = True
        return render_to_response('message.html', data)

    #获取用户信息
    infos = oauth_github.get_user_info()
    open_id = str(infos.get('id', ''))
    nickname = infos.get('login', '')

    #检查id是否存在
    githubs = OAuth_ex.objects.filter(openid = open_id, oauth_type = oauth_github.oauth_type_id)

    #获取邮箱
    if githubs:
        #存在则获取对应的用户,并登录
        _login_user(request, githubs[0].user)
        return HttpResponseRedirect('/')
    else:
        #不存在,则尝试获取邮箱
        try:
            #获取得到邮箱则直接绑定
            email = oauth_github.get_email()
        except Exception as e:
            #获取不到即跳转到绑定用户
            url = '%s?open_id=%s&nickname=%s&oauth_type=%s' % (
                    reverse('bind_email'),
                    open_id,
                    nickname,
                    oauth_github.oauth_type)
            return HttpResponseRedirect(url)

        #获取到邮箱,直接绑定
        #判断是否存在对应的用户(我这里的用户名就是邮箱,根据你的实际情况参考)
        users = User.objects.filter(username = email)

        if users:
            #存在则绑定和登录
            user = users[0]
        else:
            #不存在则直接注册并登录
            user = User(username = email, email = email)
            pwd = str(uuid.uuid1()) #生成随机密码
            user.set_password(pwd)
            user.is_active = True #真实邮箱来源,则认为是有效用户
            user.save()

        #添加绑定记录
        oauth_type = OAuth_type.objects.get(id = oauth_github.oauth_type_id)
        oauth_ex = OAuth_ex(user = user, openid = open_id, oauth_type = oauth_type)
        oauth_ex.save()

        #更新昵称
        if not user.first_name:
            user.first_name = nickname
            user.save()

        _login_user(request, user)

        data = {}
        data['goto_url'] = '/'
        data['goto_time'] = 3000
        data['goto_page'] = True
        data['message'] = u'登录并绑定成功'
        return render_to_response('message.html', data)

def _login_user(request, user):
    """直接登录用户"""
    #设置backend,绕开authenticate验证
    setattr(user, 'backend', 'django.contrib.auth.backends.ModelBackend')
    login(request, user)
代码有点多,大致处理逻辑是:
1)登录Github,返回用户id
2)判断用户id是否绑定了用户
3)若有绑定,则直接登录。若没有绑定,则获取邮箱
4)若获取邮箱成功,则直接注册和绑定;若获取不到邮箱,这调整到手工用户绑定页面
这里是收尾工作,内容比较简单:设置路由和放置登录按钮。
打开oauth的urls.py,添加如下代码:
from django.conf.urls import include, url
from oauth import views as oauth_views

urlpatterns = [
    #其他的就省略不显示

    url(r'github_login', oauth_views.github_login, name='github_login'),
    url(r'github_check', oauth_views.github_check, name='github_check'),
]
然后,在前端页面的登录位置,加入{% url 'github_login' %}和logo即可。